Intermediate Swimming Lesson 4
Lesson Summary
Learning Intentions
- Develop confidence performing tuck floats and changing shapes in the water
- Use correct body position to perform a controlled surface dive
- (Some) Explore moving underwater safely to retrieve objects or reach the pool floor
Success Criteria
- I can hold a tuck float in the water
- I can use the correct technique to attempt a surface dive
- I can submerge confidently and recover safely to the surface
We are Learning...
to control our body in the water using tuck floats and surface dives.
Curriculum Links
L Describe how your body needs to move differently to float on the surface or to dive underwater
N Float and count to 5 seconds, then try estimating the time without counting out loud
NC Develop confidence and control by learning to submerge and retrieve objects from the pool floor
Equipment
- Floats
- Weighted objects to collect
- Hoops
Key Questions
- How is tipping forward before pulling important to a successful dive?
- Why should you always extend your arms when trying to touch the pool floor?
- Can you think of any water activities where you might use a surface dive?
Tuck Float & Surface Dive
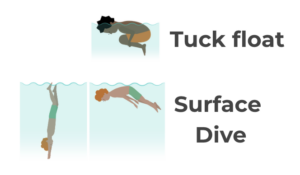
Teaching Points
✔︎ Tuck Float
- Pull your knees up to your chest and hug your legs with your arms.
- Take a deep breath and gently tip forward so your face goes into the water.
- Tuck your chin to your chest to help stay balanced.
- Keep your body small and rounded to stay afloat more easily.
- Relax your muscles, especially your back and shoulders, to help you float smoothly.
Teaching Points
✔︎ Surface Dive
- Take 1–2 deep breaths to prepare.
- Float on your front with your face in the water.
- Tuck your knees in to start tipping your body forward.
- Sweep your arms in a breaststroke motion to help pull you downward.
- Stretch into a long, straight line, pointing your body toward the bottom of the pool.
- Keep your arms extended in front of your head to protect yourself and stay streamlined.
Lesson Content
Starter Activity - The Mill Goes Round
How to play:
- Pupils stand in a circle facing the same direction
- On the teacher’s signal “The mill is turning” , pupils begin travelling around the circle together, start with walking
At different points, the teacher calls commands:
- “Mill stands still!” – Pupils freeze as quickly as possible
- “Reverse the Mill!” – Change direction safely
- “Mill is flooding!” – Dip face or head into the water and blow bubbles or fully submerge
- “Mill is spinning!” – Turn around once in place and continue travelling
- “Mill speed up!” – Travel faster using controlled movements
- “Mill slows down!” Move slowly with balance and control
Extension: Change the way of travelling e.g. hopping, jumping, doggy paddle, sculling.
Look for: Quick reactions to instructions. Controlled changes of speed and direction. Confidence submerging face/head in water. Balance and coordination while travelling. Safe awareness of others in the circle. Use of swimming skills from previous learning.
Skill Development - Surface Dive
Why it’s important: Being able to surface dive helps swimmers reach the bottom of the pool safely and effectively, without needing to dive or jump in. This skill is useful for many water-based activities, such as water hockey, diving, or object retrieval.
To surface dive well, swimmers should first be confident performing a tuck (or mushroom) float with their face in the water.
Tuck Float & Shape Transitions
Step 1: Tuck Float Practice – Ask pupils to practise the tuck float using teaching points (knees to chest, arms around legs, chin tucked, body relaxed).
Step 2: Shape Float Game – Pupils start in one float position (e.g. star float), then smoothly move into a tuck float.
Progressions / Variations:
- Star float on back ➝ tuck float
- Star float on front ➝ tuck float
- Push and glide ➝ tuck float
- Touch the bottom with feet ➝ push up into tuck
- Jump from the side ➝ submerge into tuck
- Exhale while in tuck ➝ sink to the bottom
Any other fun variations you can think of!
Look for: Knees pulled tightly towards the chest in the tuck shape. Neutral head position, neck in line with spine. Relaxed body position while floating. Smooth transitions between different float shapes. Confidence submerging and lifting feet from the floor. Calm control when holding breath. Confident and consistent regaining to feet after floating or submerging. Enthusiasm to try different combinations.
Activity - Surface dive progressions
How to play: Pupils work in pairs of similar confidence and ability. One pupil performs the activity while their partner rests, observes, and gives feedback before swapping over
Begin by helping pupils find the correct body position for a surface dive:
1 – Bring knees up towards the chest. 2 – Tip the body forwards. 3 – Allow the head and shoulders to submerge first
As confidence improves, encourage pupils to:
- Pull down more strongly with the arms
- Extend into a more streamlined position underwater
Progressions:
1. Body Position Practice – Practise tucking knees and tipping forwards into a controlled surface dive position
2. Touch the Pool Floor – Dive down and touch the pool floor with one or both hands
3. Collect Light Objects – Retrieve small, light objects from the pool floor
4. Collect Heavier Objects – Progress to collecting slightly heavier objects for added challenge
5. Swim Through Hoops – Pupils hold hoops at different depths for partners to dive through safely
6. Increase Depth – Place objects in deeper areas of the pool (where appropriate and supervised)
7. Multiple Object Retrieval – Challenge pupils to collect two or more objects in one dive
Look for: Confidence submerging head and shoulders. Controlled tipping forwards into the water. Correct body position before diving down. Streamlined underwater body shape. Calm breathing before and after diving. Efficient return to the surface. Positive partner feedback and encouragement.